Deploy Azure Virtual Desktop (WVD)
Estimated reading time: 9 minutes
Deploy Azure Virtual Desktop (WVD) HOSTPOOL
--- on moderation ---
Auto Start Virtual Machine on Connect
The Start Virtual Machine (VM) on Connect feature lets you save costs by allowing end users to turn on their VMs only when they need them. You can then turn off VMs when they’re not needed.
Create a custom role for Start VM on Connect
Before you can configure the Start VM on Connect feature, you’ll need to assign your VM a custom RBAC (role-based access control) role. This role will let Azure Virtual Desktop manage the VMs in your subscription.
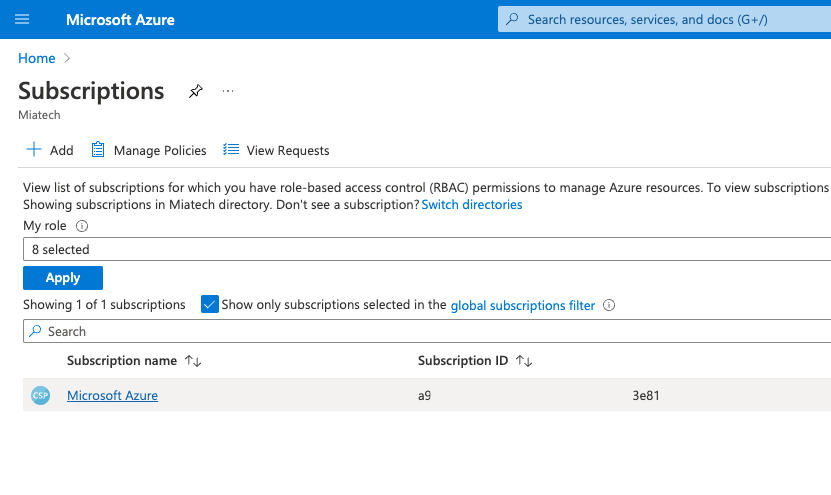
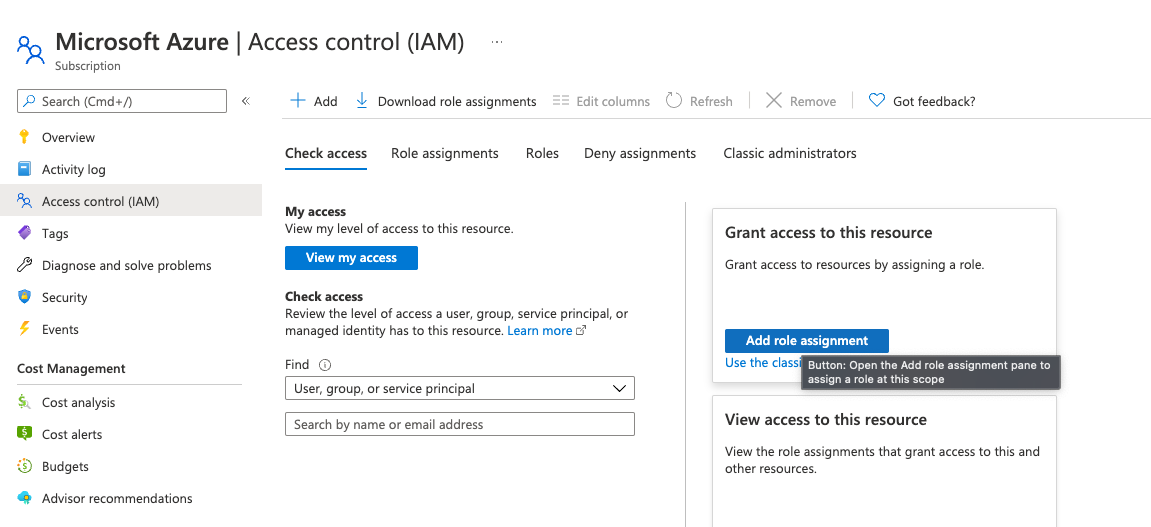
- Open the Azure portal and go to Subscriptions.
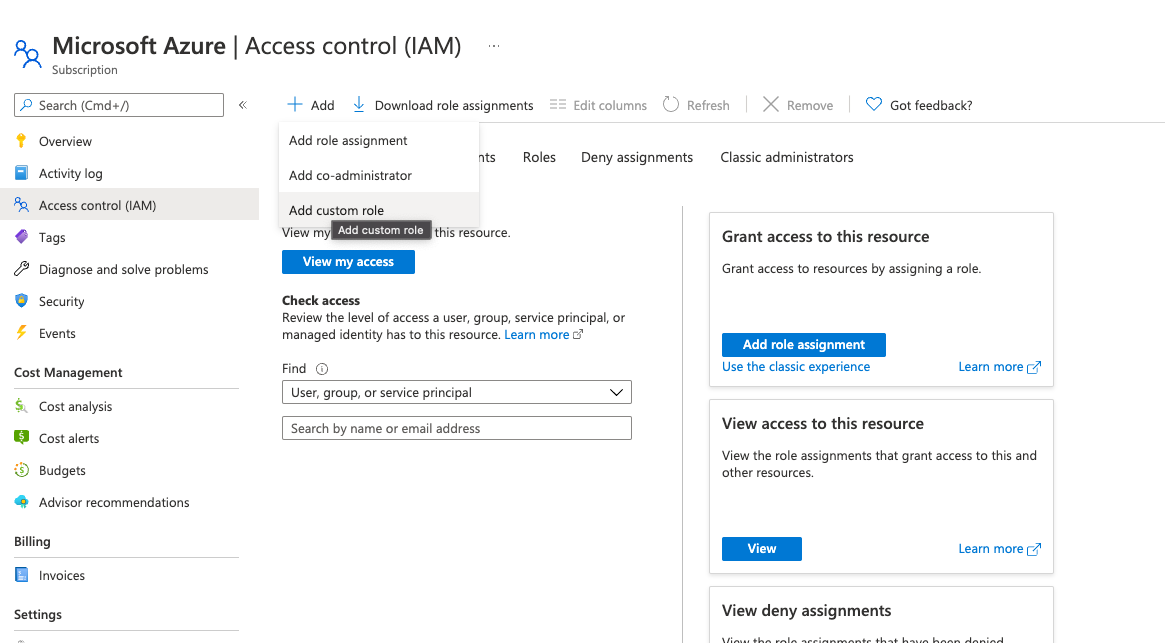
- Go to Access control (IAM) and select Add a custom role.
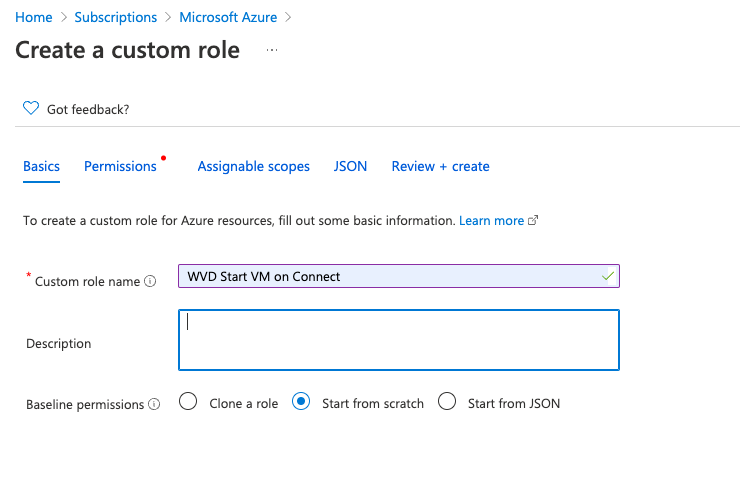
- Next, name the custom role and add a description. We recommend you name it “start VM on connect.”
- On the Permissions tab, add one of the two following sets of permissions to the subscription you’re assigning the role to:
Microsoft.Compute/virtualMachines/start/action
Microsoft.Compute/virtualMachines/read
Microsoft.Compute/virtualMachines/instanceView/read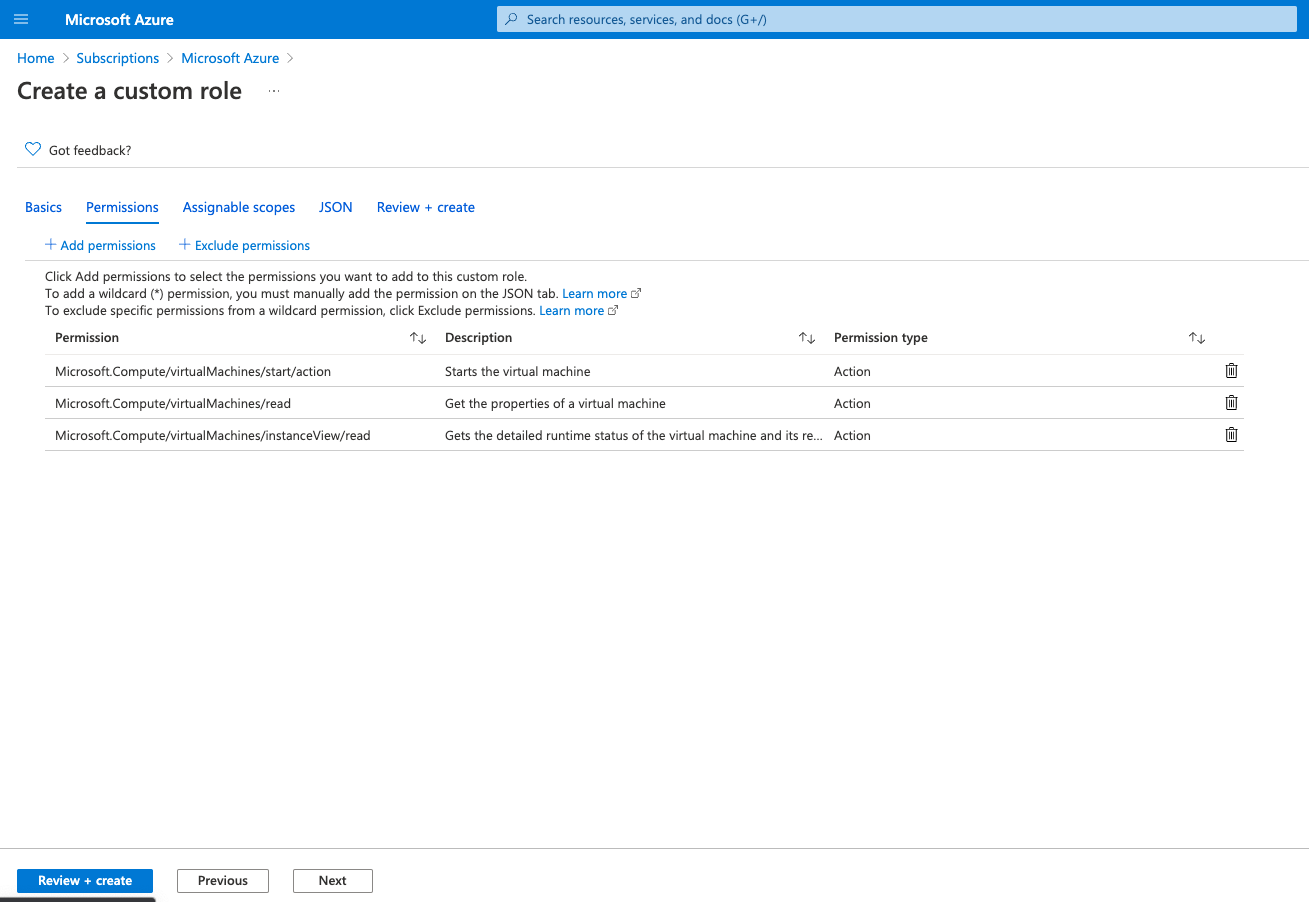
- When you’re finished, select Ok.
After that, you’ll need to assign the role to grant access to Azure Virtual Desktop. To assign the custom role:
-
In the Access control (IAM) tab, select Add role assignments.
-
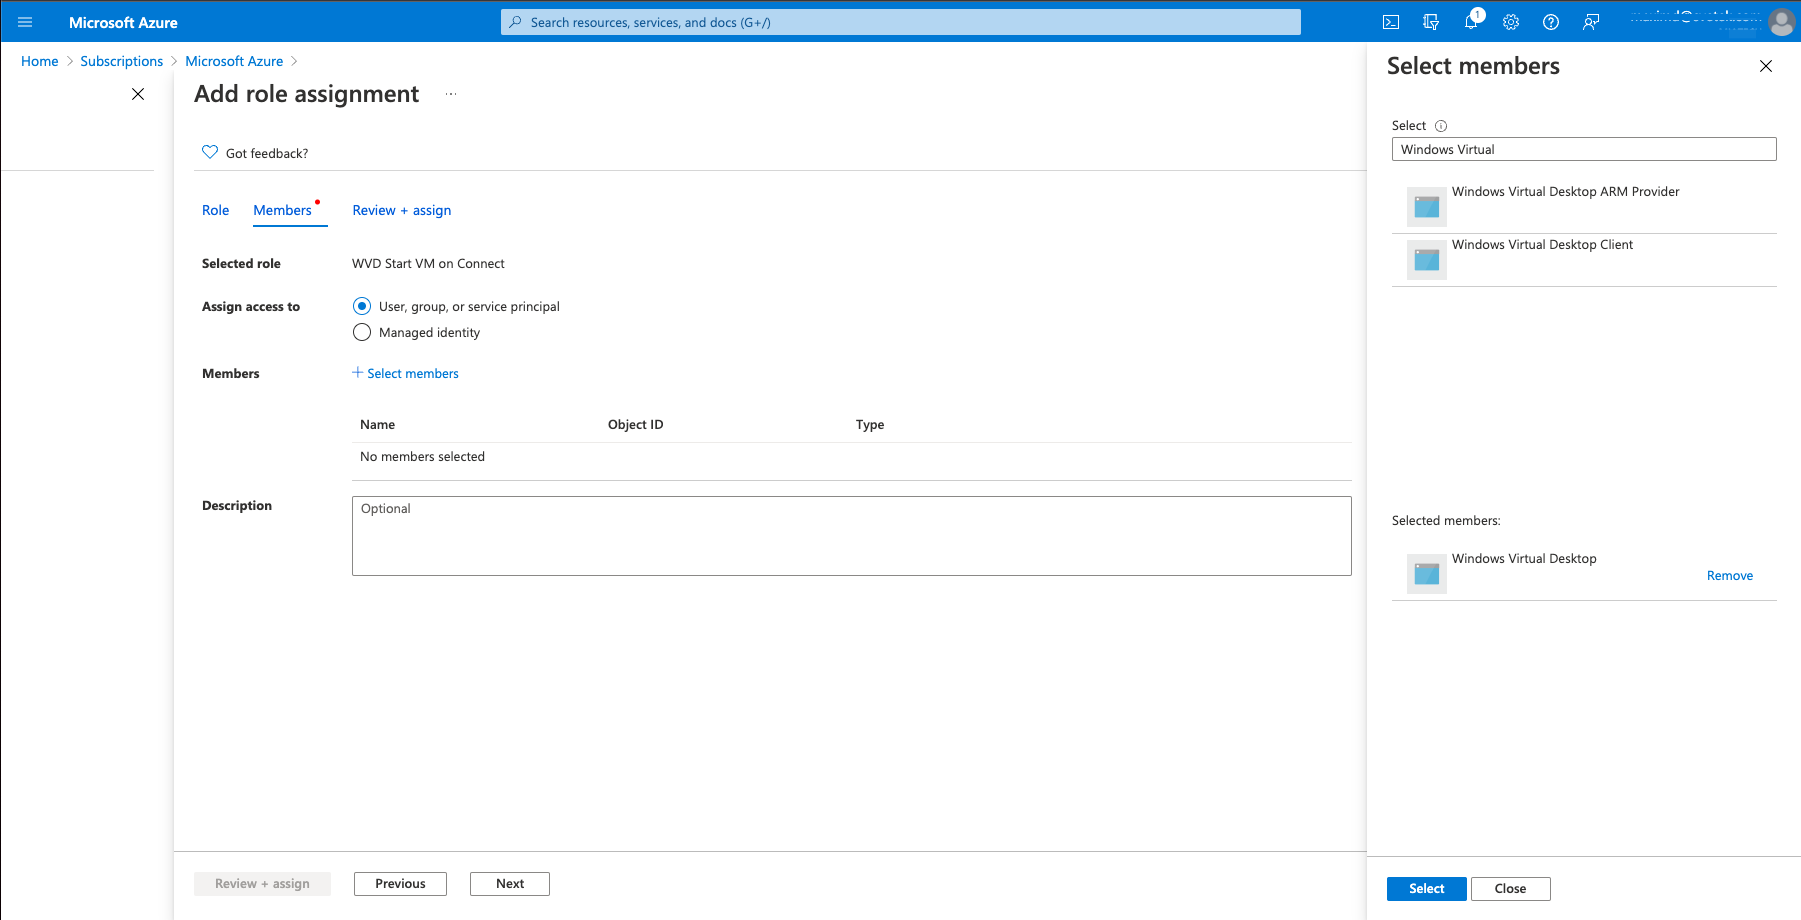
Select the role you just created.
-
In the search bar, enter and select Windows Virtual Desktop (this will soon be updated to “Azure Virtual Desktop”).
Configure the Start VM on Connect feature
Start VM on Connect is a host pool setting. If you only want a select group of users to use this feature, make sure you only assign the required role to the users you want to add.
To use the Azure portal to configure Start VM on Connect:
- Open your browser and go to the Azure portal.
- In the Azure portal, go to Azure Virtual Desktop.
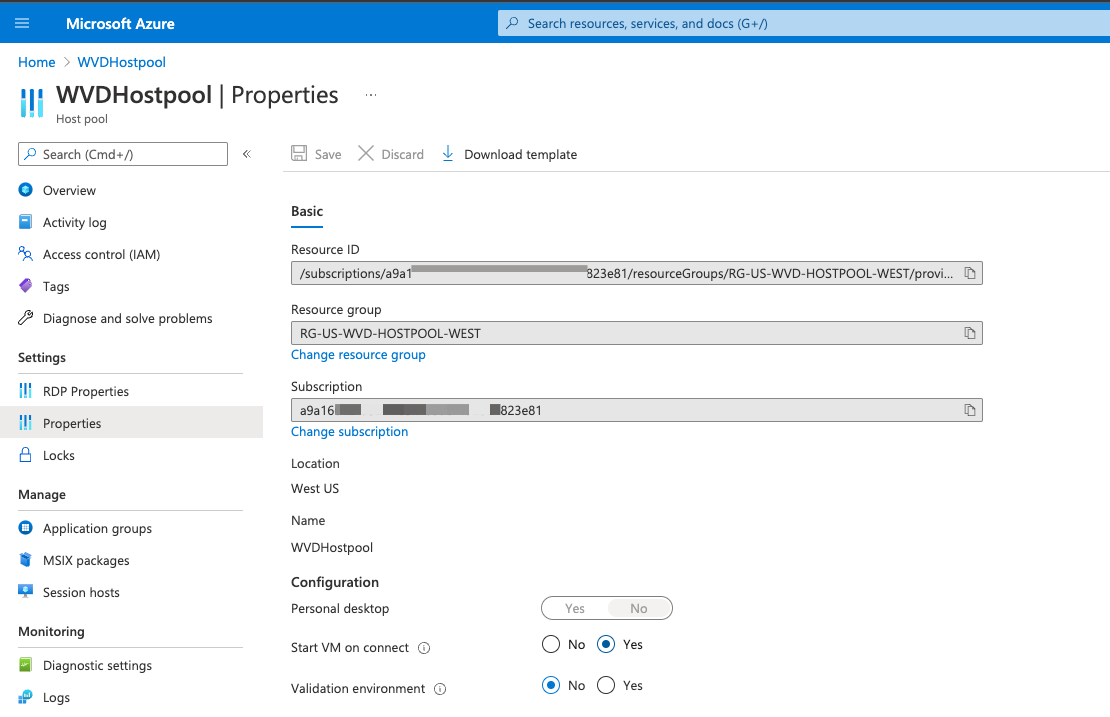
- Select Host pools, then go to the host pool where you want to enable the setting.
- In the host pool, select Properties. Under Start VM on connect, select Yes, then select Save to instantly apply the setting.
REFERENCES
Microsoft Start Virtual Machine on Connect
Prepare AVD VM (WVD)
ENABLE Acelerated Network on VM D2sV4
To enable Acelerated network for AVD VMs, run the below powershell script on an Azure VM Domain controler for every AVD VM.
Don’t forget to change $VMWVDNAME before you run the script.
$VMResGroup="RG-US-WVD-VM-WEST"
$VMWVDNAME="vm-wvd-west-2111"

 # Acelerator Network Enabled
$nic = Get-AzNetworkInterface -ResourceGroupName $VMResGroup -Name $VMWVDNAME
$nic.EnableAcceleratedNetworking = $true
$nic | Set-AzNetworkInterface
JOIN VMs AVD (WVD) TO AD
add-computer –domainname "mia****.local" -restart
Create storage account on Azure for FSLogix user profile
Below is the script connecting AD to your Azure subscription, creating storage account and configuring Fslogix
#Create temp folder
New-Item -Path 'C:\temp' -ItemType Directory -Force | Out-Null

# Download AzFilesHybrid files for connect to Azure and extract them
$wc = New-Object System.Net.WebClient
Write-Output $wc.DownloadFileTaskAsync("https://github.com/Azure-Samples/azure-files-samples/releases/download/v0.3.2/AzFilesHybrid.zip", "C:\temp\AzFilesHybrid.zip")

Expand-Archive -LiteralPath 'C:\temp\AzFilesHybrid.zip' -DestinationPath C:\temp\AzFilesHybrid
cd C:\temp\AzFilesHybrid

Set-ExecutionPolicy -ExecutionPolicy Unrestricted -Scope CurrentUser
#Install-PackageProvider -Name NuGet -Force
Import-Module -Name .\AzFilesHybrid.psd1

# Connect to Azure Subscription
Connect-AzAccount

# Need edit params
$location = "eastus"
$SubscriptionId = "Subscription ID"
$ResourceGroupName = "RG-US-WVD-INFRA-EAST"
$StorageAccountName = "ch*****"
$DomainAccountType = "ServiceLogonAccount" # ComputerAccount or ServiceLogonAccount
$OrganizationalUnitDistinguishedName = "OU=azure,DC=ch******,DC=local"

Select-AzSubscription -SubscriptionName $SubscriptionId

# List current storage accounts
Get-AzStorageAccount -ResourceGroupName $ResourceGroupName

# Create new storage account for FSLogix user profiles
New-AzStorageAccount -ResourceGroupName $resourceGroupName `
  -Name $StorageAccountName `
  -Location $location `
  -SkuName Standard_LRS `
  -Kind StorageV2

# Join storage account to the Domain controller
join-AzStorageaccountForAuth -ResourceGroupName $ResourceGroupName -Name $StorageAccountName -DomainAccountType $DomainAccountType -OrganizationalUnitDistinguishedName $OrganizationalUnitDistinguishedName
$storageaccount = Get-AzStorageAccount -ResourceGroupName $resourceGroupName -Name $StorageAccountName
$storageaccount.AzureFilesIdentityBasedAuth.DirectoryServiceOptions
$storageaccount.AzureFilesIdentityBasedAuth.ActiveDirectoryProperties
Create SMB file share to store FSLogix profiles
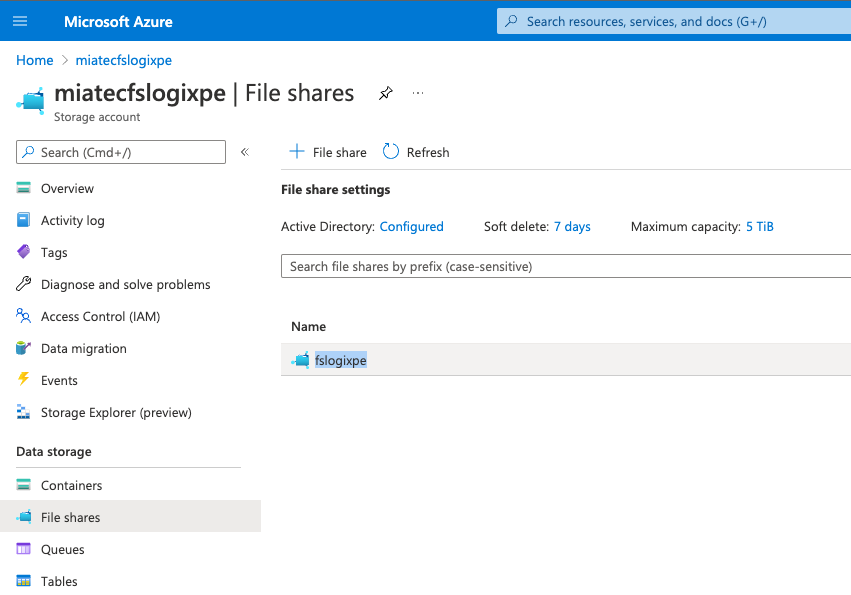
Open portal.azure.com and goto storage account.
Press New fileshare and type name: fslogixpe
Create 2 Security Groups on DC on OU synced to Azure AD:
FSLogix Share Elevated Contributor
FSLogix Share Contributor
You can use only one Security Group “FSLogix Share Contributor” for provide access to FSLogix profiles.
If you want make changes NTFS permissions, create another group “FSLogix Share Elevated Contributor” for your admins.
Add AVD Users to the FSLogix Share Contributor Group and run a sync in Azure Connect!!!
Grant security groups access to fileshare fslogixpe
Open portal.azure.com and goto storage account.
Goto “Access Control (IAM)” -> “Role assignments”
Add groups FSLogix Share Elevated Contributor with the “Storage File Data SMB Share Elevated Contributor” role
and FSLogix Share Contributor with the “Storage File Data SMB Share Contributor” role

Mount a share on a DC and AVD VMs
Try mounting a share on a DC and AVD VMs and make sure users have access to the share without typing a username and a password.
net use W: \\ch*****.file.core.windows.net\fslogixpe /user:Azure\wvdusername
Install DUO MFA Agent, AVD Agent, FSLogix Agent on AVD (WVD) VMs
Below script will download msi packages DUO MFA agent, FSLogix Agent, AVD Agent. When downloading is done, all software will be installed automaticaly with settings found in variables. Also this script will setup RDP session settings.
Before running the script be sure to edit all variables.
$registryPath = "HKLM:\SOFTWARE\FSLogix\Profiles"
$FslogixSharePath =  "\\storageaccountwvd.file.core.windows.net\fslogixpe"

$DouIKEY = "DIXXXXXXXXXXXXXXXXXXXX"
$DuoSKEY = "xxxxxxxxxxxxxxxxxxxxxxxxxxxxxx"
$DouHostAPI = "api-xxxxxxxx.duosecurity.com"
$DouArguments = @('/S', '/V"', '/qn', "IKEY=$DouIKEY", "SKEY=$DuoSKEY", "HOST=$DouHostAPI", 'AUTOPUSH="#1"', 'FAILOPEN="#1"', 'SMARTCARD="#0"', 'RDPONLY="#0"', 'UAC_PROTECTMODE=#2')


$scriptStartTime = get-date

#Create temp folder
New-Item -Path 'C:\temp\apps' -ItemType Directory -Force | Out-Null

#Download all source file async and wait for completion
$scriptActionStartTime = get-date
Write-host ('*** STEP 0 : Download all sources [ '+(get-date) + ' ]')
$files = @(
    @{url = "https://dl.duosecurity.com/duo-win-login-latest.exe"; path = "c:\temp\apps\duo-win-login-latest.exe"}
    @{url = "https://download.microsoft.com/download/4/8/2/4828e1c7-176a-45bf-bc6b-cce0f54ce04c/FSLogix_Apps_2.9.7654.46150.zip"; path = "c:\temp\apps\fslogix.zip"}
    @{url=  "https://query.prod.cms.rt.microsoft.com/cms/api/am/binary/RWrmXv"; path = "c:\temp\apps\Microsoft.RDInfra.RDAgent.Installer-x64-1.0.3050.2500.msi"}
    @{url=  "https://query.prod.cms.rt.microsoft.com/cms/api/am/binary/RWrxrH"; path = "c:\temp\apps\Microsoft.RDInfra.RDAgentBootLoader.Installer-x64.msi"}
)

foreach ($f in $files)
{
    Write-Output "DOWNLOAD $f"
    $wc = New-Object System.Net.WebClient
    Write-Output $wc.DownloadFileTaskAsync($f.url, $f.path)
}

$scriptActionDuration = (get-date) - $scriptActionStartTime
Write-Host "Total source Download time: "$scriptActionDuration.Minutes "Minute(s), " $scriptActionDuration.seconds "Seconds and " $scriptActionDuration.Milliseconds "Milleseconds"

#Install FSLogix
$scriptActionStartTime = get-date
Write-host ('*** STEP 1 : Install FSLogix Apps [ '+(get-date) + ' ]')
Expand-Archive -Path 'C:\temp\apps\fslogix.zip' -DestinationPath 'C:\temp\apps\fslogix\'  -Force
Start-Sleep -Seconds 10
Start-Process -FilePath 'C:\temp\apps\fslogix\x64\Release\FSLogixAppsSetup.exe' -ArgumentList '/install /quiet /norestart' -Wait
$scriptActionDuration = (get-date) - $scriptActionStartTime
Write-Host "*** FSLogix Install time: "$scriptActionDuration.Minutes "Minute(s), " $scriptActionDuration.seconds "Seconds and " $scriptActionDuration.Milliseconds "Milleseconds"


#Configure FSLogix
New-ItemProperty -Path $registryPath -Name "Enabled" -Value 1 -PropertyType DWORD -Force | Out-Null
New-ItemProperty -Path $registryPath -Name "DeleteLocalProfileWhenVHDShouldApply" -Value 1 -PropertyType DWORD -Force | Out-Null
New-ItemProperty -Path $registryPath -Name "PreventLoginWithFailure" -Value 1 -PropertyType DWORD -Force | Out-Null

# MULTIPLY SESSIONS
New-ItemProperty -Path $registryPath -Name "ConcurrentUserSessions" -Value 1 -PropertyType DWORD -Force | Out-Null
New-ItemProperty -Path "HKEY_LOCAL_MACHINE\SOFTWARE\Policies\FSLogix\ODFC" -Name "ConcurrentUserSessions" -Value 1 -PropertyType DWORD -Force | Out-Null

New-ItemProperty -Path $registryPath -Name "VHDLocations" -Value $FslogixSharePath -PropertyType MultiString -Force | Out-Null
 ######################
# Install DUO Login https://help.duo.com/s/article/1090?language=en_US

echo $DouArguments

$scriptActionStartTime = get-date
Write-host ('*** STEP 1 : Install DOU Apps [ '+(get-date) + ' ]')
Start-Process -FilePath 'c:\temp\apps\duo-win-login-latest.exe' -ArgumentList $DouArguments -Wait
$scriptActionDuration = (get-date) - $scriptActionStartTime
Write-Host "*** DOU Install time: "$scriptActionDuration.Minutes "Minute(s), " $scriptActionDuration.seconds "Seconds and " $scriptActionDuration.Milliseconds "Milleseconds"

# Set params for RDP sessions timers
reg add "HKLM\SOFTWARE\Policies\Microsoft\Windows NT\Terminal Services" /v fResetBroken /t REG_DWORD /d 1 /f
reg add "HKLM\SOFTWARE\Policies\Microsoft\Windows NT\Terminal Services" /v MaxIdleTime /t REG_DWORD /d 43200000 /f
reg add "HKLM\SOFTWARE\Policies\Microsoft\Windows NT\Terminal Services" /v MaxConnectionTime /t REG_DWORD /d 43200000 /f
reg add "HKLM\SOFTWARE\Policies\Microsoft\Windows NT\Terminal Services" /v MaxDisconnectionTime /t REG_DWORD /d 600000 /f
reg add "HKLM\SOFTWARE\Policies\Microsoft\Windows NT\Terminal Services" /v RemoteAppLogoffTimeLimit /t REG_DWORD /d 0 /f

reg add "HKLM\SOFTWARE\Policies\Microsoft\Windows NT\Printers\PointAndPrint" /v NoWarningNoElevationOnInstall /t REG_DWORD /d 1 /f
reg add "HKLM\SOFTWARE\Policies\Microsoft\Windows NT\Printers\PointAndPrint" /v UpdatePromptSettings /t REG_DWORD /d 1 /f
Read logs: %ProgramData%\FSLogix\Logs
REFERENCES
Original Microsoft Policies TerminalServer-Server
azure, avd, wvd, deploy